How I Made My BMO (Adventure Time) Costume
- By Robyn Lee
- Oct 23, 2013
- Comments
Note: This post is totally not food-related. For foodstuffs, please read this post from three days ago, especially because that post took a buttload more hours to write than this one. Yeah, two posts in one week! MADNESS.

- BMO, I SHALL BECOME YOU.
Last year, I dressed up for Halloween for the first time in over 15 years. And I did it...for love.
Or, more specifically, I did it because it was the first time one of Kåre's visits to New York City coincided with Halloween and I thought it'd be a shame if he didn't experience the one day a year where it's acceptable to wear silly costumes in public and gorge on fun-size candy*. Someone's gotta guide him through the labyrinth of American customs. And that someone is me. By default.
* Alas, Kåre still hasn't fully experience Halloween because Hurricane Sandy put a damper on last year's festivities, among other far more important things. We had fun wearing our costumes to a few parties the weekend before Halloween.
We dressed up as characters from our favorite cartoon, Adventure Time, because nothing else would've been acceptable. Nothing. Kåre dressed up as Jake and I dressed up as BMO. If you're not familiar with BMO then get out of my face watch some videos and learn. LEARN:
...Actually, you may not have learned much from those videos. But maybe you can at least see why BMO is my spirit robot.
Never having made a costume before, I did a bit of research into different kinds of BMO costumes. They mostly come in full-body BMO or simpler BMO-with-head-popping-out-the-top. Deep down, I really wanted to go full BMO, but I knew I wasn't ready for that jelly. A well constructed full-body costume was too complicated for my amateur skills, and even if I could make one it would give me the double whammy of low visibility and mobility in dark and/or crowded spaces. ...And it would make it harder for me to stuff food into my face.
So I went the simple route of BMO-with-head-popping-out-the-top and added interchangeable face parts to make it less boring. It's not 100 percent true to BMO's design, but it's close enough.
Making a BMO costume doesn't require much instruction ("get a box and paint it and decorate it to look like BMO"), but if you're looking for some inspiration among the loads of other tutorials, here are my instructions. I know this is pretty last minute for this year's Halloween, but I started making my costume last year on the 24th, so YOU CAN DO IT IF YOU BELIEVE IN YOURSELF. Or just save this for Halloween 2014. Yup.
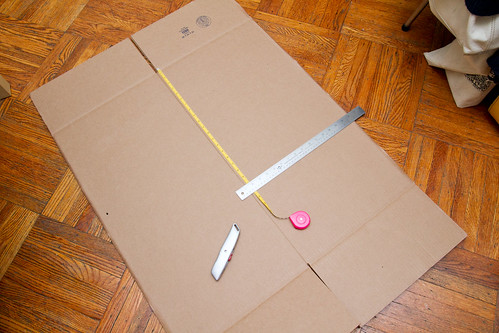
First, measure the distance between your arm pits so you know how wide the box should be. My pit distance (the scientific term, surely) is 15 inches, so my instructions reflect that.
My supplies:
- Cutting mat (I recommend this 12" x 18" mat. It's a great size—not too big or small—and I've been using it for years.)
- Box cutter
- Scissors
- 15" x 15" x 30" box that opens from the top (varies, unless you're the same size as me)
- Long metal ruler
- Measuring tape
- Pencil for marking stuff
- Gesso*
- BMO-colored turquoise acrylic paint* (I used Liquitex BASICS in Bright Aqua Green. I bought two 250 mL tubes but in ultimately only needed one.)
- Paintbrushes in assorted sizes*
- Newspapers or whatever for painting on top of
- Black permanent marker*
- A compass or something else you can use to draw circles with (I used bowls and pan lids)
- Spray adhesive* (I used 3M Super 77 Multi-Purpose Adhesive)
- Thick white foam core board*
- Colored paper* in yellow, red, light blue, and neon green
- 12" x 6" white or off-white sheet of felt*
- Thick black poster paper*
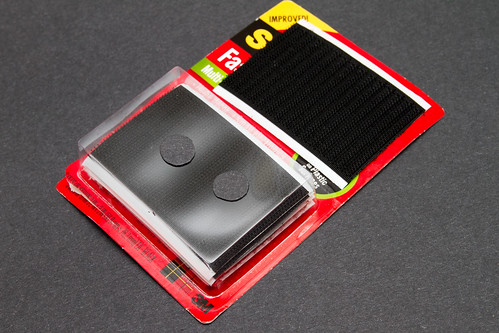
- Adhesive Velcro-style fasteners* (I used 3M sheets)
- Turquoise long-sleeve T-shirt and tights/leggings (I got mine at UNIQLO)
- Pair of shoelaces
- An awl or some other hole poking tool
- Sort of optional, but you may as well get 'em: small controller-shaped box with attached lid, and string (for BMO's controller)
* For you New Yorkers, I bought these supplies (nearly all the important stuff that I didn't already own) at Pearl Paint on Canal and Broadway. If you can't find something there, you can check out the nearby Utrecht on Lafayette and Howard. If you need to buy a box, there's a nearby UPS store on Centre Street, although if I am to be thorough, I'll note that I bought my box at the independent UPS store that used to be on Howard Street next to Opening Ceremony and has since moved to a smaller space somewhere on Lafayette Street. I used to go to that store for all my shipping supplies, but I haven't gone there since they moved. The woman who ran the place was super duper nice.
Ok, let the building begin.
- I'm gonna cut yew.
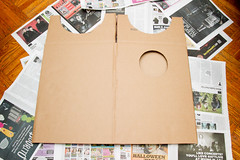
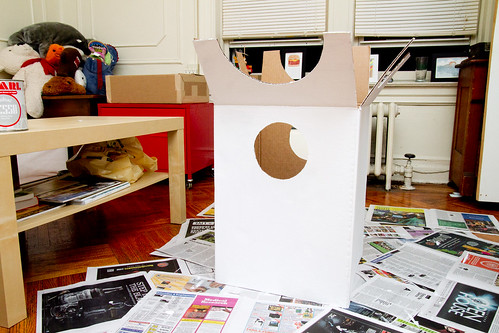
First, cut your box down to size if it's not perfectly BMO proportioned. After measuring a few pictures of BMO, I settled on an approximate 1:1.3 height-to-width ratio, meaning I cut my 15"-wide box down from 30" to 20" tall. (MATH, I DID IT.)
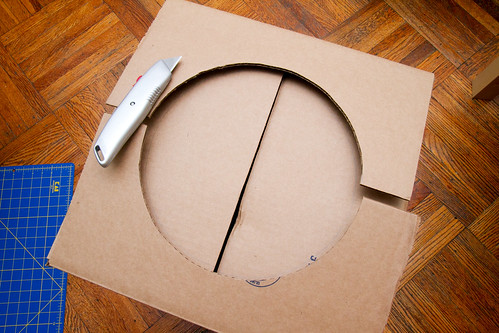
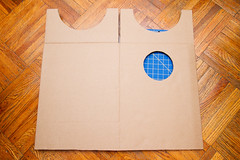
- Almost poke-head-through-able.
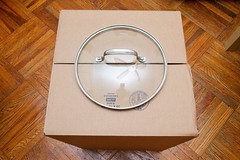
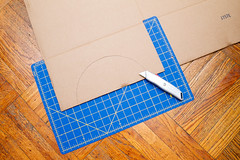
Next, cut a hole in the top of the box. I used a 10" pan lid to draw the circle.

- Bowls, so versatile.
Your arms need holes too, so cut those babies out a few inches from the edge of the box. I used a bowl with a 6" diameter, which was the perfect size to fit the BMO letters (to be added later).
- Box, now with more holes.
You're ready to paint!
- Or you could stop here and go as "Ghost Box."
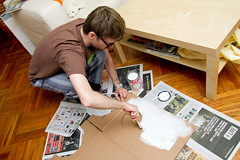
Put down plenty of newspaper or whatever, and slather on that gesso (or if you're me, make Kåre do it). Not being an artist, I honestly don't know if using gesso makes much of a difference, but I figured if I was going to bother making a homemade costume I may as well cover all my bases.
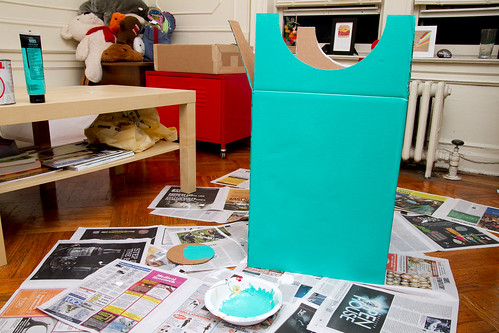
- No more Ghost Box. GHOST BOX IS DEAD. Wait what.
After the gesso dries, slather on the turquoise paint (or, again, make Kåre do it).
- BMO IS TAKING FORM.
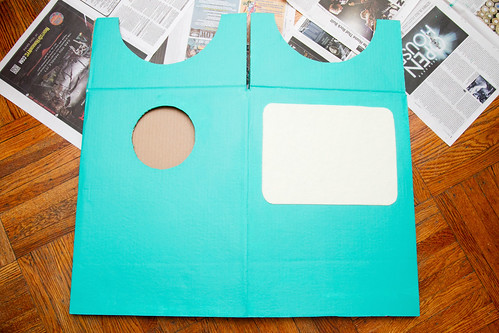
I bought two sheets of felt since I wasn't sure if one would be enough. Luckily, one standard 12" x 6" fit perfectly; all I had to do was round the edges. Spray the adhesive on carefully (on top of the newspaper so you can cover every inch of felt) and position it on the box more carefully. Don't mess up because that stuff is damn sticky. Definitely do not accidentally step onto the sticky newspaper while moaning, "Ohhh craaappugughahahahh," leaving the heels of your socks sticky and spotted black with newspaper ink for months.
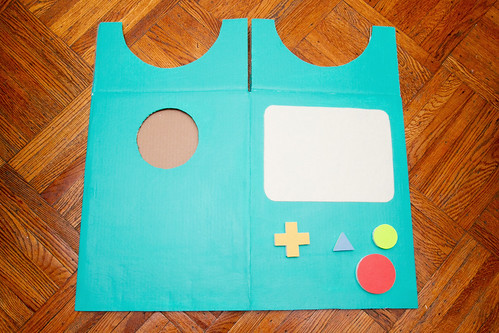
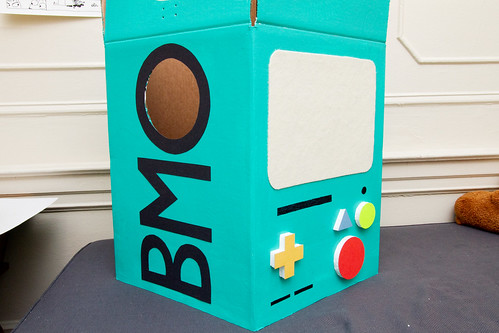
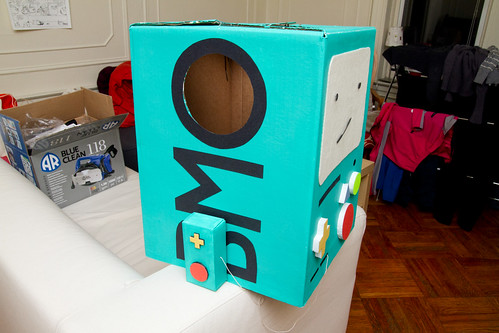
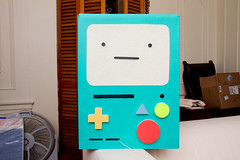
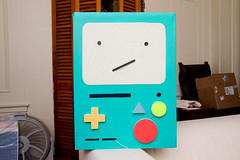
- Non-functioning buttons, yay!
Cut out a plus sign, two circles, and a triangle out of the foam core board and the respective color papers. Glue the paper shapes onto the foam shapes.
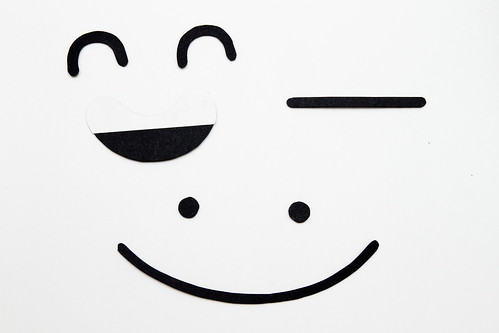
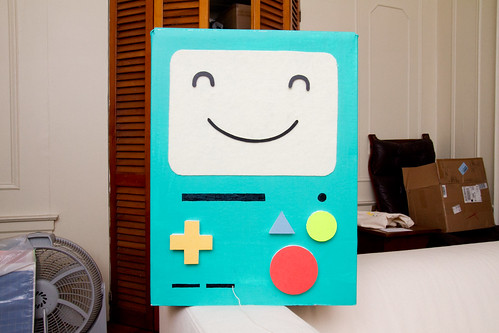
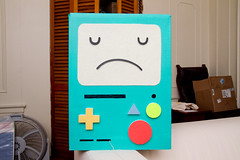
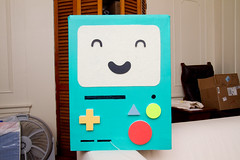
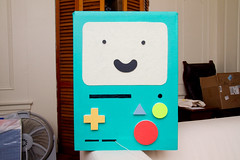
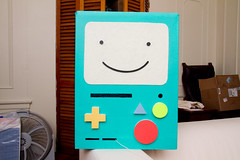
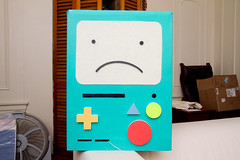
- Face!
Cut face parts out of the thick black poster paper. You want these to be pretty sturdy since they'll inevitably get manhandled. I went with a pair of happy eyes (which can also act as sad/sleepy eyes), a pair of dot eyes, an open mouth (also a sad open mouth), a closed smile (also a sad mouth), and a neutral mouth. You don't have to make as many face bits, of course. I originally put teeth on the open mouth, but I nixed it later since it looked weird.
- Face Velcro.
Cut our corresponding shapes from the hook side of the fastener stripes. You don't need much to make it stick to the felt.

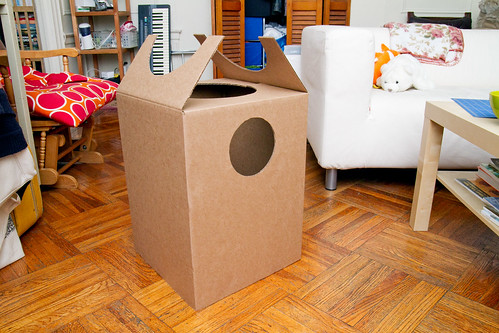
- BMO letters.
Draw vent and panel details on the back of the box with permanent marker.
Draw two sets of capital Bs, Ms, and Os to glue down the sides of the box. The size of the letters depends on the size of the O, which fits around the arm hole. I made my letters 1-inch thick, but I messed up the M because I'm durmb. I didn't notice the M's were twice as thick as they should've been until I had already glued one of them down. :C MY MASTERPIECE, PARTIALLY RUINED.
- ALMOST DONE.
Draw details on the front and glue buttons down. Glue BMO letters down the sides of the box.
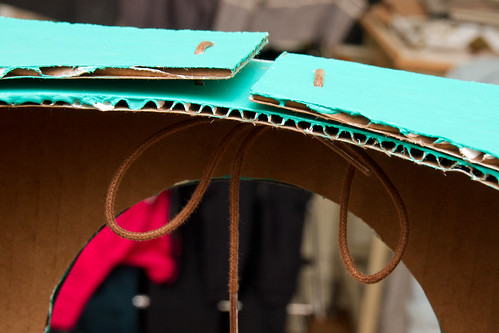
- Shoelaces to the rescue.
To make the box easily collapsible I fastened it closed with shoelaces. You don't have to use shoelaces, of course. Just poke holes in the flaps, string the shoelaces through the holes, and tie 'em up.

- Face bits inside!
- Controller position.
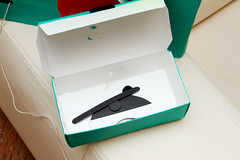
Now, that last bit: the controller. The only reason I added a controller. upon Kåre's suggestion, was because I happened to have a small box that was perfect for it (an old take-out container for cookies). The box is about 5.5" x 1.5" x 3". It totally doesn't look like BMO's joystick controller, but I didn't mind my inaccuracy because the controller's main function is to hold the face parts. Kåre helped me paint it and make two more buttons for it. If the lid doesn't close securely, stick a little bit of Velcro on the lid's flap and inside the box to keep it closed. Keep the controller attached to the costume with a strip of Velcro, and add a decorative string because it ain't a wireless controller.

- Just a handful of the possibilities.
Aaand omg TIME FOR FACE! So many faces you can choose from! Emotions! Feels! Just keep in mind that the felt pills over repeated Velcro-ings.
Oh yeah, time to put it on a human body. That was the point, I think.
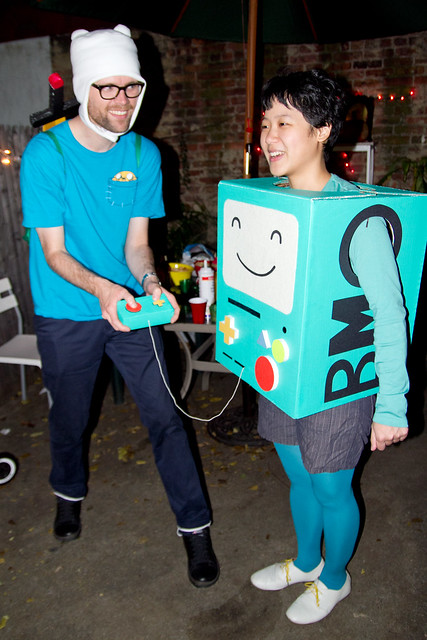
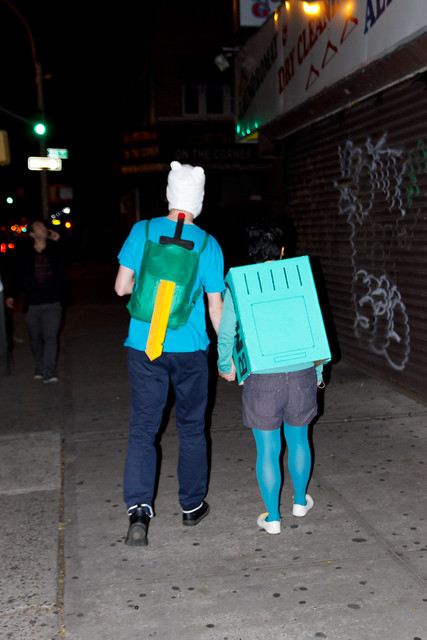
- A Finn and his BMO.
Not too shabby. I had the shirt figured out, but I had given less though to how the bottom half of my body would fit in there. At the last minute I realized I couldn't just wear tights without any shorts. And I didn't have blue shoes at the time (I do now). Oh well, close enough.
More photos for ya:

- Kåre as Finn, me as BMO, Chris as the Cosmic Owl, and Lee Anne as Marceline.
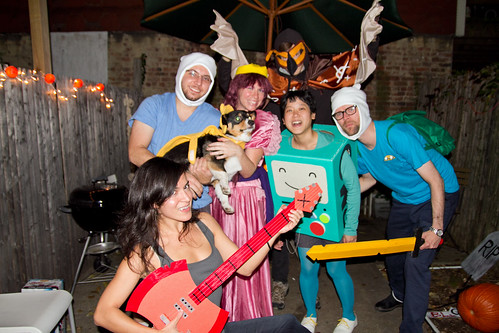
- More Adventure Time costumes! Lee Anne's friends dressed up as Finn and Princess Bubblegum and they dressed up their corgi as Jake.
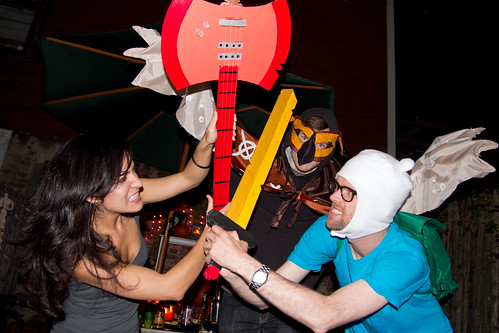
- Marceline vs. Finn!
What are y'all dressing up as for Halloween?
Comments
BMO is my favorite! I'll have to check what I can do about the costume. Thanks for the great blog!
OMG. TOO CUTE. Hahahahah. Love it.
I'm going to be a Sharknado! I didn't even see the movie, but I already have a flying shark that's just begging to be used :)
D: Thanks for reading!
Adam: Thanks, I AIM TO CUTE!
Lacey: Haha, awesome idea!
Aww the two of you are adorable!
awww YOU GUYS!!!
All my students quote them ( I work at a highschool), even my Gr. 12's. And now YOU! So....I guess I should watch it?
On another note, I recently went to NY (for the 4th time) and gave a shout out to you on my burger review. I don't think you're going to be happy about a conclusion I made. :(((
http://thebeejays.blogspot.ca/2013/10/my-new-york-burger-review.html#more
Jamie: Thanks!
chocolatesuze: (^_^)
Jo: Damn, I would so fit in with those high schoolers! Unlike when I was in high school. (I did not have a great time in high school. Maybe it's because Adventure Time had yet to exist?)
And AHHH oh no, I'm sorry I led you astray! ;_; That Shake Shack rec usually works well, but I know not everyone loves it. I wonder if it was just an off day, or maybe it's a matter of burger preference (I liked smashed-style burgers more than any other style)...well, I'm glad it wasn't a big investment at least. The Breslin's lamb burger is one of my faves as well, but I've only eaten it once because it's a bit pricey. Worth the money, though...yeah, I should go back there.
And congratulations on your marriage!
Love love love your costumes!! This is my favorite BMO clip:
http://www.youtube.com/watch?v=-kkSy_rXAXI
M: Thank you! And yes, that is a fantastic clip. I probably said that quote too many times the night I wore that costume. :)